
In last few weeks I have been reading a lot about Swift architecture and best practices. MVVM is one of the most discussed architecture pattern out there.
The power of MVVM comes from binding between view and view models. There are lot of ways this can be achieved in iOS:
- Callback
- KVO such as RZDataBinding
- Delegates
- Notifications
There are also frameworks from the FRP world that can bring most out of this pattern.
I also thought to give my two cents about the MVVM pattern. First few basic concepts
- VM simply extracts the business/app logics out of VC
- View Model (VM) does not know anything about the View Controller (VC)
- VC can have string reference to VM but VM should not have strong reference to VC.
- VM and VC communicate view delegates or Functional Reactive Programming (FRP)
In this post I will implement something like following:
MVVM + Coordinator or Navigator + Store
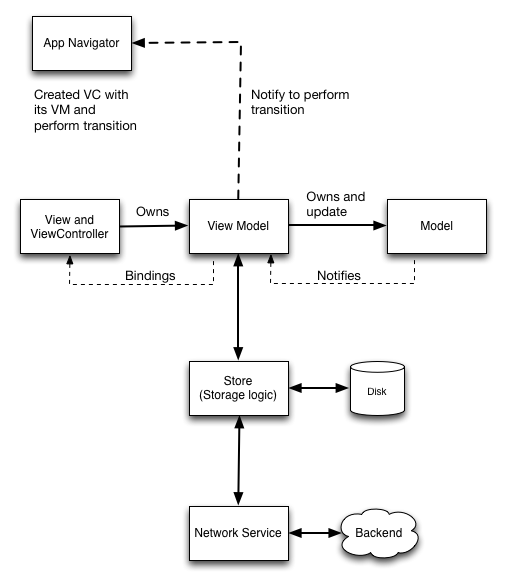
I have taken the concept of “Store” from the book iOS Programming: The Big Nerd Ranch Guide which introduced the pattern MVCS (Model-View-Controller-Store). In our case the pattern will be MVVMCS to be more specific.
I will be using the API from TMDB for my backend communication.
Here first I will be taking non Reactive approach and later will compare and implement Reactive framework to see how it can improve our application.
Models
    import ObjectMapper

    struct Movies: Mappable {

        var page: Int?
        var results: [Movie]?
        var dates:[String: AnyObject]?
        var total_pages: Int?
        var total_results: Int?

        init?(map: Map) {

        }

        mutating func mapping(map: Map) {

            page            <- map["page"]
            results         <- map["results"]
            dates           <- map["dates"]
            total_pages     <- map["total_pages"]
            total_results   <- map["total_results"]

        }
    }

    struct Movie: Mappable {
      ...
    }
Here we have used ObjectMapper to map objects to and from JSON
View Controllers
Ok for the first view I will go with storyboard initialization and associate VM with the VC directly. I know this is not the proper MVVM way to do it.
    class HomeViewController: UIViewController {

        @IBOutlet weak var tableView: UITableView!

        @IBOutlet weak var segmentButton: UISegmentedControl!

        var viewModel = MovieListViewModel()

        ...
But for the second VC which is MovieDetailViewController we will set its VM using property based DI.
    class MovieDetailViewController: UIViewController, ViewControllerProtocol {

        var viewModel: ViewModelProtocol! {
            didSet {
                print("View model is set")
            }
        }
        ...
Now you might be wondering what is ViewControllerProtocol. This is the protocol that every view controller can implement to make sure its view model is set.
    protocol ViewControllerProtocol {
        var viewModel: ViewModelProtocol! { get set }
    }
Its benefit will be cleared more in app navigation or transitioning between views.
View model
We have MovieListViewModel that will fetch the movie list from backend database and display it in the view.
Now here I can use binding frameworks to bind my views with the view model. Any reactive framework will be great but for simplicity will be use closures.
The simplest way I can bind is using closure. For eg: In VC I can say:
    self.viewModel.movieListLoaded = { [unowned self] _ in
      self.tableView.reloadData()
    }
And in VM I have:
...

    var movieListLoaded: (()->())

    ...

    switch response {
            case .Success(let result):
                self.movieListLoaded()
    ...
But this can be too much sometimes. There is lot of code to implement. Also we should listen to some property change.
For that reason I like the implementation of Dynamic class which is explained nicely by Srdan Rasic
    class Dynamic<T> {
        typealias Listener = (T) -> Void
        var listener: Listener?

        func bind(listener: Listener?) {
            self.listener = listener
        }

        func bindAndFire(listener: Listener?) {
            self.listener = listener
            listener?(value)
        }

        var value: T {
            didSet {
                listener?(value)
            }
        }

        init(_ v: T) {
            value = v
        }
    }
So now our MovieListViewModel will look like:
    protocol MovieListProtocol: ViewModelProtocol {

        var page: Dynamic<Int> { get }
        var dates: Dynamic<[String: Any]> { get }
        var totalPages: Dynamic<Int> { get }
        var totalResults: Dynamic<Int> { get }

        func getMovieList(_ apiType: MovieApiType)
    }


    class MovieListViewModel: MovieListProtocol {

        var movies = [Movie]()
        var page: Dynamic<Int>
        var dates: Dynamic<[String: Any]>
        var totalPages: Dynamic<Int>
        var totalResults: Dynamic<Int>
And since it is owned by first view controller the init method is:
    init() {
            self.dates = Dynamic([String: Any]())
            self.page = Dynamic(0)
            self.totalResults = Dynamic(0)
            self.totalPages = Dynamic(0)
        }
Now binding is very easy just add this to VC:
    // Binding code
    self.viewModel.page.bindAndFire { [unowned self] page in
        if page > 0 {
            self.tableView.reloadData()
        }
    }
Here we are listening to “page” property.
Store
Store can be a simple struct or a class. For simplicity I kept it struct.
    struct MovieListStore {
        func getMovies(_ apiType: MovieApiType, callback:@escaping (Result<Movies>) -> Void) {
            // logic is to be implemented in case of caching of data
            NetworkService().get(apiUrl: apiType, request: nil) { response in
                callback(response)
            }
        }
    }
In out VM we can call store like:
let movieListStore = MovieListStore()

    self.movieListStore.getMovies(apiType) { [unowned self] response in
      ...
    }
Store contains the storage logic. Some application cache or stores data on the device. So in accordance with single responsibility principle and to make code more testable a separate module is created called Store.
Network Service
This is a class which takes care of all the network related activity. I have used Alamofire for conducting all network related operations. You can also combine Alamofire with ObjectMapper using AlamofireObjectMapper. But here I will just map it manually.
final class NetworkService: Gettable {

    func get(apiUrl: ApiProtocol, request: AnyObject?, completion: @escaping (Result<Movies>) -> Void) {

      let (method, url) = apiUrl.httpMethodUrl()
      Alamofire.request(url, method: method)
          .validate()
          .responseJSON { response in
              switch response.result {
              case .success:
                  guard let jsonValue = response.result.value else { return }
                  guard let movieList = Mapper<Movies>().map(JSONObject: jsonValue) else { return }
                  completion(Result.Success(movieList))

              case .failure(let error):
                  print(error)
                  completion(Result.Failure(APPError.ServerError(message: error.localizedDescription)))
              }
          }
    }
For more information on “Gettable” protocol checkout Protocol-Oriented-Networking in Swift. It is good practice to implement protocols as it will later allow us to create mocks for testing.
Coordinator or App Navigator
Here I have taken the very simplest case of app navigation i.e to go from one view to another. This is the simplest way of doing navigation. I will explore more on this.
enum NavigationType {

        case push
        case pop
        case modal
        case show
    }

    protocol AppNavigatorProtocol {

        associatedtype ViewControllerType
        associatedtype ViewModelType

        func navigateTo(destination: ViewControllerType, navigationType: NavigationType, viewModel: ViewModelType)
    }

    class AppNavigator: AppNavigatorProtocol {

        static let navigator = AppNavigator(window: ((UIApplication.shared.delegate?.window)!)!)
        let storyboard: UIStoryboard
        let navigationController: UINavigationController

        init(window: UIWindow) {
            self.storyboard = UIStoryboard(name: "Main", bundle: nil)
            self.navigationController = window.rootViewController as! UINavigationController
        }

        func navigateTo(destination: ViewControllerProtocol, navigationType: NavigationType, viewModel: ViewModelProtocol) {

            var vc = self.storyboard.instantiateViewController(withIdentifier: destination.className) as! ViewControllerProtocol
            vc.viewModel = viewModel

            print(destination.className)

            switch navigationType {
            case .push:
                self.navigationController.pushViewController(vc as! UIViewController, animated: true)
                break
            default:
                break
            }
        }

    }
This is an ongoing project where I will keep improving the code based on feedbacks and comments. So please feel free to give your thoughts.
I am also going to add unit tests to the project to learn about adding test cases, mocking and code coverage.
Post header image Designed by vectorjuice / Freepik